Mandaris Moore


I thought I'd document what I've learned about setting up Sublime Text 3 to work with a python virtual environment so that I don't have to look this up multiple times. Hopefully someone else will find this information helpful as well.

Set up the project area

All projects start in a project folder that I set up.

I like to keep all my projects in a parent folder. This way applications like Timing can track that I'm being productive in my chosen terminal application.

Creating the virtual environment

Using the mkvirtualenv command to create a new environment.

I use the mkvirtualenv wrapper scripts to make the virtual environment. All the projects that I'm currently working with are using virtualenv because they are supporting python 21.

Make sure that the environment is set up without errors
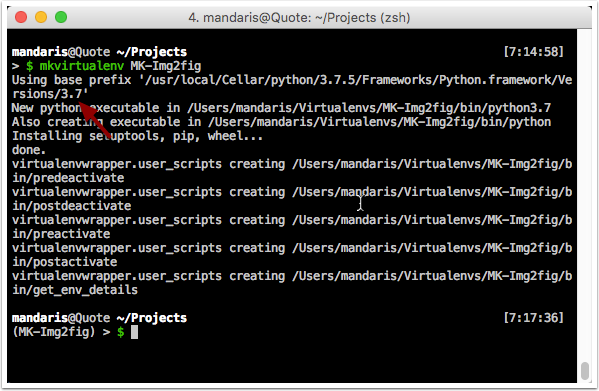
Verifying no errors in environment creation.

I like to make sure that it's setting up my expected version of python during this step.

Make the activate script executable
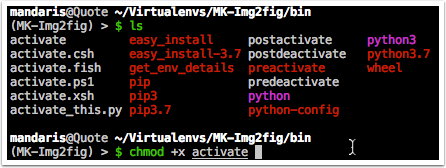
Make sure that the environment comes up correctly.

I currently see a problem where this script doesn't execute properly. I make sure that it can run. While I'm in that directory I check the versions of pip and python as well.

Note: My Virtualenv isn't in a hidden directory.

Test that the activate really works

Test that the activate script is executable.

60% of the time it works all the time. I don't understand the convention of having a script without the file extension.

Create a directory for this specific project.

Create a directory for this specific project.

Once again, I place this in my home project directory. I like to make sure that I have everything in it's own place so I don't have to think about where stuff is.

Edit the postactivate for the virtualenv

Using vi to edit postactivate for the virtualenv.

I like to read over it and it acts as a double check that it was generated correctly.

Add a command to the postactivate

Adding a command to the postactivate script.

I make my virtual environments switch to the project directory that I'm working in when activated. This is just a convinence for me, but I've seen tutorials on how to make it so the virtual environment is brought up when you switch to the directory.

Check that the environment is pointing to the correct version of python
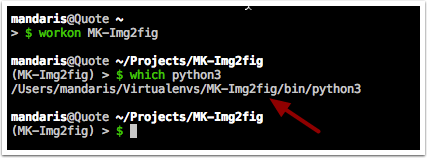
Check that it is _not_ using the systems version of python.

You want to make absolutely sure that this is using the virtual env's python and not your system's. I think this is pretty important as python 2 is moving to end of life.

Run pip to install any needed libraries.

Call python to run the pip module to install.

I read about it done this way because it forces the environment to place the needed libraries within the correct site-packages folder.

Checking that the installation worked

Review the installation output.

Hopefully everything installed cleanly or at least gave an error on why it didn't work.

Clone the project into the directory

Place whatever project that I'm working on in the directory.

In this case, I've got a new python project that I created on github. I create the project on github so that I could use there basic python template and github actions.

Once again, I do this so that I can differentiate multiple projects and versions. We all have projects that aren't finished and this helps me by eliminating wondering what versions things are at.

Check that all the files are there

Your project folder is going to be different.

It's all part of "trust-but-verify". I've seen a lot of misspellings.

Open the folder in Sublime Text
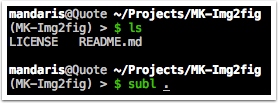
Opening the project in Sublime Text from the command line.

I've set my mac up to use Sublime Text from the command line.

Set up the Sublime Text project
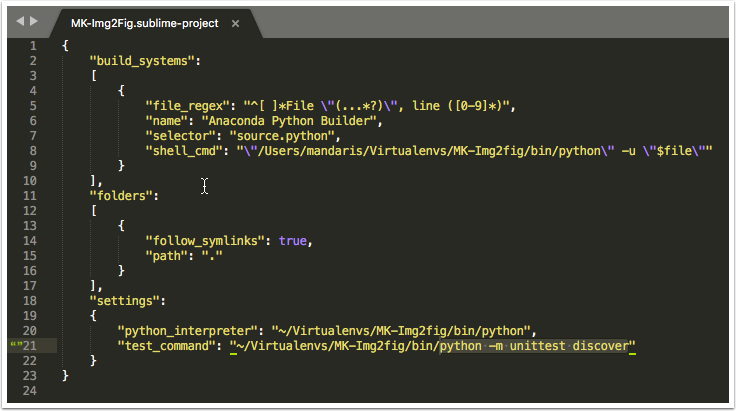
Sublime Text showing the build system.

When you create a new Sublime Text project, you can specify how it handles builds and tests. This allows me to specify the exact version of python without having to go to the command line.

{
    "build_systems":
    [
        {
            "file_regex": "^[ ]*File \"(...*?)\", line ([0-9]*)",
            "name": "Anaconda Python Builder",
            "selector": "source.python",
            "shell_cmd": "\"/Users/mandaris/Virtualenvs/MK-Img2fig/bin/python\" -u \"$file\""
        }
    ],
    "folders":
    [
        {
            "follow_symlinks": true,
            "path": "."
        }
    ],
    "settings":
    {
        "python_interpreter": "~/Virtualenvs/MK-Img2fig/bin/python",
        "test_command": "~/Virtualenvs/MK-Img2fig/bin/python -m unittest discover"
    }
}

After this, I can iterate with my code knowing that everything is set up properly.

Conclusion

I'm hoping that future me or someone else finds this informative. It was fun putting it together.


  1. This might change after January 1st according to PEP 373


In my last post, I left off with a list of things that I wanted to work on for the next release of the design of the blog. I'm still changing the header at the top of the page and I've been working on improving the contrast of the colors you see for links to make it easier to read. Something you can't spot just by looking is the fact that <h1> - <h3> tags don't correspond to the breakdown of the syntax of the rest of the site.

A small sample of the code that was being generated.

What do I see on the internet

I feel that a lot of the sites that are on the internet only use the <h1>, <h2>, <h3> tags and looking at some of the templates that I've come across for pelican use css classes to differentiate them in the design.

I don't have a problem with that, but I felt that it doesn't help those that might be using some kind of screen reader or parsing system1.

Searching for a solution

Once again, I started looking for a place where this had already been fixed and quickly found one that would make sure that the html that python-markdown would give me would match what I was expecting to give to my template.

Christian Prieto had already come up with this handy solution in 2016 and had put some tests and an example of how to incorporate it into pelican.

But there are further complications

Unfortunately, pelican has changed since the original and I wasn't able to get the solution to work. The readme says to add the following:

MD_EXTENSIONS = ['downheader']

But the latest documentation found here, have the markdown default to be defined as a dictionary and not an array2. The simplest way to get it to work is to change your pelicanconfig.py to have the following code.

# Markdown Plugins
MARKDOWN = {
    'extension_configs': {
        'markdown.extensions.codehilite': {'css_class': 'highlight'},
        'markdown.extensions.extra': {},
        'markdown.extensions.meta': {},
        'downheader': {},
    },
    'output_format': 'html5',
}

For me, I had to specify a value because the title of my site is in a <h1> tag and the article headers are in <h2>.

# Markdown Plugins
MARKDOWN = {
    'extension_configs': {
        'markdown.extensions.codehilite': {'css_class': 'highlight'},
        'markdown.extensions.extra': {},
        'markdown.extensions.meta': {},
        'downheader': {'levels': '2'},
    },
    'output_format': 'html5',
}

I've since made a pull request so that others can get around this as well.

Conclusion

I'm happier and happier with the way that the site is coming together, but I'm afraid of the amount of technical debt that the site is accruing as I go along. I've to to make the readme a priority for those who come after me and want to make this design better.

I've also taken some time to just take the header and just make a standalone project that demonstrates how it works. I points to the simple theme that comes with pelican so people can just download it after installing pelican, python-markdown and the mdx_downheader package.


  1. From what I've seen a lot of webcrawlers use the headers of a page to determine whether a site was worth putting in search results. 

  2. This isn't the only place that has this, but I've been having trouble just getting the projects that I am using up to date. Heck, my readme is one line at this point! 


I think I'm ready to mark my second pelican theme 1.0 as "Feature Complete" today! I started off with -what I thought- a simple premise of having a site site took a lot longer than I expected but I'm pretty happy with the site for now. But before I tag it and start working on 2.0, I want to go over what I've done so far.

Visualization of what I've accomplished with the blog.

Parsable

The first thing I started researching was how to make the site parsable by webcrawlers. Although it's a personal blog, I wanted people to be able to find the content easily.

OpenGraph

OpenGraph was the first thing that I came across and appealed to me the most because it's the preferred way of parsing data for Twitter1.

I found it especially rewarding that the tags are also parsed by facebook and my new favorite social network slack.

One of the technical difficulties that I ran into when adding OpenGraph tags was adding the images. The specification for OpenGraph states that images to be used need to be added as meta data in the head of the html. This can be a pain as the other data like title and date can be pulled from the article itself and I didn't want to go through all my old posts to add image meta data.

Luckily, the github user WhiskyEchoBravo had a project that searched the content of the post for images and added the first to the list of tags. I'm a little proud that I helped with issues with pages.

Afterwards, I did run into some frustration when the images that I added to posts wouldn't be as big as I expected.

Post in slack with a small image.

Ultimately, I think it's because of the mixing and matching of having OpenGraph and twitter specific tags and was solved it by making sure I used the following for my twitter card.

<meta name="twitter:card" content="summary_large_image" />

And now I get the post to unfurl nicely.

Post in slack with a large image.

Schema.org

This is the styling used by both Bing and Google. I put this in as a challenge to myself to make it work in both instances. I leaned a lot from the example on OrbitingWeb and refined what I was working with using another example that I found on github.

Valid Semantic Tags

For this, I just wanted to use some of those really cool semantic tags that html5 has given to us. When I look at the code for some pages on the internet I see a lot of <div> tags with classes that could be replaced with <main>, <nav>, or <section> tags.

I'm willing to just attribute it to my desire to have my own style or maybe just inexperience, but I'm happy to report that the site passes html validation except for the OpenGraph definitions found in the header.

figure it out

One technical hurdle I ran into was that I wanted my images to be wrapped in the <figure> tag and also have a <figcaption> tag that would have the alternative text.

I searched for a plugin for pelican2, but the closest thing I could find was liquid tags at the time3.

I did find jdittrich figureAltCaption project on github which was a extension for the python-markdown that pelican uses. I even submitted a pull request to allow it to do reference links!

There was a little confusion on getting it to work because pelican has been changing since some of these plugins were created.

Long story short, I had to add the following to my pelicanconfig.py to get it to work.

   # Markdown Plugins
MARKDOWN = {
    'extension_configs': {
        'markdown.extensions.codehilite': {'css_class': 'highlight'},
        'markdown.extensions.extra': {},
        'markdown.extensions.meta': {},
        'figureAltCaption':{},
    },
    'output_format': 'html5',
}

Easy to share

I wrote down that I wanted the site to be easy to share and it is when you look at the amount of tags and metadata that is in every page.

At one point, I wanted to add share buttons, but -with the rise in concerns about privacy- I wanted the users of the site to be the ones who would share it.

Also, I'm still working on color schemes so the buttons might clash with whatever I end up with.

Clash of the social buttons!

Accessible

One of the underlining principles of this site design is that I wanted it to be accessible to as many people as possible. It's part of the reason that I've worked so hard on making sure that I included so many semantic tags. I didn't think that this was particularly hard to do when you understand what needs to happen before you begin.

The theme doesn't have any errors at this point, but does loose some points because of the way that markdown headers are handled and the fact that I picked a low contrast color for my links. I'll fix it soon.

Conclusion and where I'm going next

Overall, I'm happy with this version of the site and blogging about it has helped me think about what places I want to refine going forward.

List of things to improve

  • Create a decent readme with all the packages and properties that the theme uses
  • Improve color contrast for reading
  • Add Cristian Prieto's mdx_downheader
  • Make the top navigation a little less clunky
  • Look into how to integrate micro.blog posts

If you want to contribute you can find the theme on github here.


  1. Twitter is still my social network of choice and -despite it's flaws- is not as creepy as facebook. 

  2. Seriously didn't see Chris MacMackin's figure-ref until I was writing this article. I'll have to look into it for my next version. 

  3. I used this to make my previous theme Tufte and did not want to go down that road twice. It is very specific to pelican and I didn't want to dive into more regular expressions when I knew there had to be a solution already created. 


The power went out this morning and left the house in darkness except for my laptop. I took this time to get some work done with my plugin for Pelican but I found myself at a stand still because I wanted to get some information on how regular expressions parse results into a dictionary.

With the internet not working, I decided that I'd try seeing what is available with the REPL in python and I found it to be fairly helpful in the fact that I had access to the documentation in the same interface as the code that I was writing.

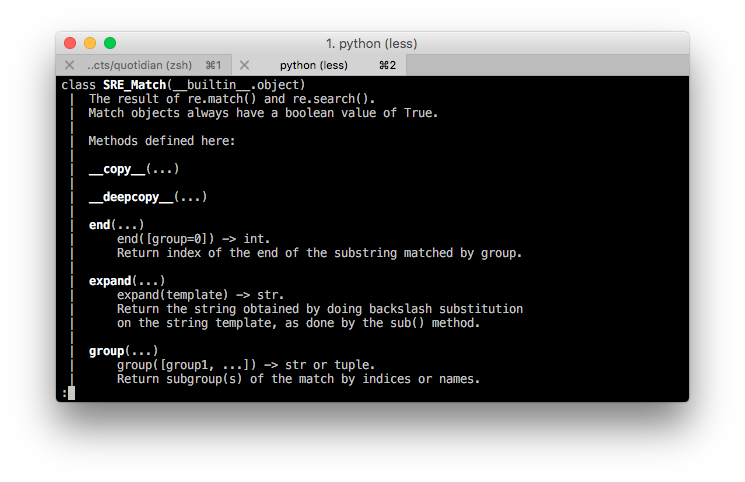
In my case, I wanted to find out what methods are part of the match class. Sure, I ran into a minor bump of not knowing how to get help to show me the documentation of match directory, but I quickly got around that by run help on the match object that I created.

Exploring python in the terminal

Honestly, this gives me a little more confidence in myself that I can find things out on my own without having to turn to the internet and finding myself getting side tracked by all the destractions that someone can find.